Page 1 of 1
Glyos Tips & Tricks!
Posted: Fri Feb 05, 2016 11:21 pm
by ThatGuyNamedJoe
This is the thread to post any tips you've got when building or customizing Glyos!
You can use a Callgrim gun assembly to pull switchpins from thicker Glyos pieces (Weaponeers, etc), which definitely makes it less likely to destroy your fingernails!

First attach the gun to the pin (as shown above) then try to use lots of force while bending it to the side (it's hard to describe, but you'll see what I'm talking about). The pin should come out far enough to make it fairly easy to remove manually.
Re: Glyos Tips & Tricks!
Posted: Tue Feb 23, 2016 4:38 pm
by WTGTIV
The divot on the bottom of a BIC lighter is perfect for pushing in switch pins.
Re: Glyos Tips & Tricks!
Posted: Tue Feb 23, 2016 11:14 pm
by NoPaintRequired
When cutting the Traveler's right hand to open it up and have it hold things, start at the bottom of the hand, against the palm, and work towards the thumb. I wouldn't try this with any other figure's hands though. Except maybe Noboto.
Re: Glyos Tips & Tricks!
Posted: Wed Feb 24, 2016 4:16 am
by calvindavis
NoPaintRequired wrote:When cutting the Traveler's right hand to open it up and have it hold things, start at the bottom of the hand, against the palm, and work towards the thumb. I wouldn't try this with any other figure's hands though. Except maybe Noboto.
I'd never have thought of doing that, but just having had a look now, that seems totally doable. Have you got pictures of a successfully opened Traveler hand?
Re: Glyos Tips & Tricks!
Posted: Wed Feb 24, 2016 5:20 pm
by NoPaintRequired
Mainly for Skeledens to hold their ax deeper. Now when I say open, I don't mean splayed out, but to allow it to wrap around things like cords or other toy accessories.

Re: Glyos Tips & Tricks!
Posted: Wed Feb 24, 2016 5:29 pm
by calvindavis
Dude, that is awesome! Thanks for the pic.
Re: Glyos Tips & Tricks!
Posted: Wed Feb 24, 2016 5:50 pm
by ThatGuyNamedJoe
NoPaintRequired wrote:Mainly for Skeledens to hold their ax deeper. Now when I say open, I don't mean splayed out, but to allow it to wrap around things like cords or other toy accessories.
I've been able to push the axe in the hand very far without doing that before soooooo
Re: Glyos Tips & Tricks!
Posted: Wed Feb 24, 2016 8:23 pm
by NoPaintRequired
Bravecarrot22 wrote:NoPaintRequired wrote:Mainly for Skeledens to hold their ax deeper. Now when I say open, I don't mean splayed out, but to allow it to wrap around things like cords or other toy accessories.
I've been able to push the axe in the hand very far without doing that before soooooo
I was nervous with the early releases of the Skeleden armor, that it felt like I would tear the axe before. Since the Pyrosurge release though I felt more confident with pushing the axe, and I've stopped.
Re: Glyos Tips & Tricks!
Posted: Wed Feb 24, 2016 8:31 pm
by ThatGuyNamedJoe
NoPaintRequired wrote:Bravecarrot22 wrote:NoPaintRequired wrote:Mainly for Skeledens to hold their ax deeper. Now when I say open, I don't mean splayed out, but to allow it to wrap around things like cords or other toy accessories.
I've been able to push the axe in the hand very far without doing that before soooooo
I was nervous with the early releases of the Skeleden armor, that it felt like I would tear the axe before. Since the Pyrosurge release though I felt more confident with pushing the axe, and I've stopped.
I have been able to do it with just a lot of playing with the figure but a little hairdryer magic helps greatly.
Re: Glyos Tips & Tricks!
Posted: Wed Feb 24, 2016 9:20 pm
by NoPaintRequired
It helps with the Imaginext weapons greatly though.
Re: Glyos Tips & Tricks!
Posted: Thu Feb 25, 2016 4:15 pm
by Mutt12
Ersico showed me this trick like three years ago. If you want a cheap switch pin, you can get a set of 60 of these things at Hobby Lobby for like 2 bucks and some change. The flamey end also makes a good muzzle flash for Glyos guns.

Re: Glyos Tips & Tricks!
Posted: Mon Jul 24, 2017 12:48 pm
by kranix
*
dusts off thread*
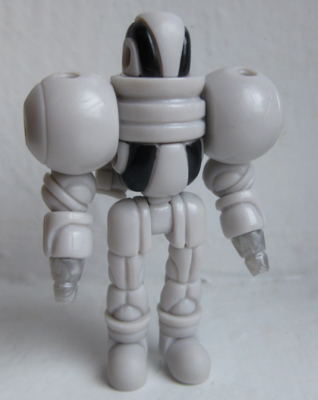
So, found out something interesting. See the feet here?
Those originally had tampos. Turns out, if you have some
Brasso, a cotton swab, and some patience, you can actually erase the tampos from Glyos parts. Just be sure to wash the piece afterwards with some dish detergent and warm water when you're done, dry, and it should be good to go!
Now, here's the hitch: for non-metallics, it will leave a matte finish on the piece, in contrast to the shinier finish on most Glyos parts, and it can be downright impossible to completely clean a seam line.
Just one last thing: if you try this, please do so in a well-ventilated area!
Re: Glyos Tips & Tricks!
Posted: Sat Jul 29, 2017 11:57 am
by Cappy
A fingernail buffer will bring that PVC sheen back to those boots in a heartbeat!
Re: Glyos Tips & Tricks!
Posted: Tue Mar 27, 2018 6:31 am
by akum6n
A good building tip posted by Matt on the blog recently:
Matt wrote:I use one of the standard "treasure" shipping boxes (not the extra big one) with a "c" cut horizontally (like the c is laying down on its opening) in the middle area of the box.
I then slide the hairdryer in that slot and heat everything for 40 second bursts, shuffling the parts inside the closed box between blasts. You'll end up doing this multiple times throughout a larger build.
Often, I'll also heat all the separated parts up for a specific build and let them sit for a few hours before I get started, letting the "memory" of the shapes and fits return to their original state. This can even the playing field and help with loose connections that happen from certain parts combinations and connection pressure.
After I complete a build, I'll then heat the whole assembled thing (sometimes the extra big shipping box comes out for mongo-sized ones) and then let it sit an hour before handling it.
I've always used a hot box for disassembling Glyos, but never thought about the pre- and post-heating techniques!